We are starting a new blog series called Probuilds. Some of our most asked questions revolve around different kayak builds. While the best build for you will always be the one that is specific to the way that you fish, we want to spotlight some of the most innovative kayak builds out there.
Today we asked Rick Garavaglia to walk us through his latest Moken 12.5 V2 build.
“What ‘must-have’ modifications does this need to turn this into even more of a fishing machine?”
“What mods do I want to try that I have thought about in the past?”
“What mods do I need to skip?”
“Do I skip some mods permanently or do I need to wait and see how this works without them?”
“What ideas do others have who own Mokens?”
“How do I want to build it?”
“Should I go to the Facebook owners groups and search for ‘Moken upgrades’?”
These were some of the questions going through my head.
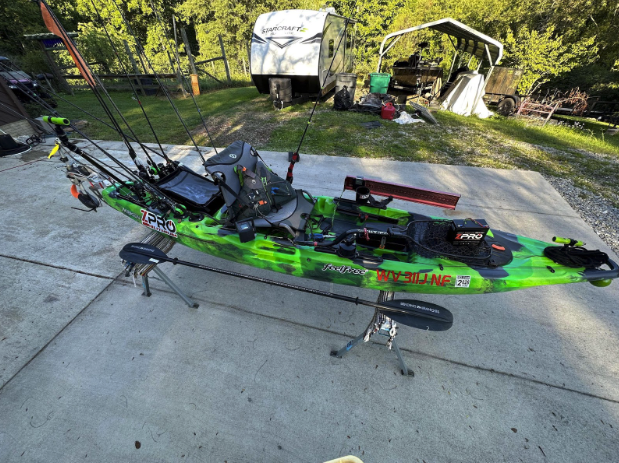
I knew that I wanted a trolling motor on my Moken. I use this Moken for tournaments, so I need to get from place to place in a hurry. I also wanted good rod storage, an anchor system, and a camera mount. Those were my main objectives going in. This is my build, and how I put it all together.
I’ve included a list of these items that I installed and that I use on my kayak. If you have any questions please feel free to contact me on any of my social media platforms. I’d love to interact with you and help in any way that I can.
Enjoy

1.Trolling Motor
I installed a Torqeedo 1103AC which required me to add a 4” aluminum YakAttack track for the Torqeedo throttle install.
After installing the Torqeedo, I needed to run cables for foot steering and the cord for the reverse lock. I have read a lot of comments over the years expressing the frustration with this aspect of installing a Beavertail Rudder and in my case the steering cables for my Torqeedo. My first word of advice is to take a deep breath and know that this could be a challenge. Patience is a virtue, just like being patient while fishing. My second piece of advice is to make sure the cables have a clean cut and really focus on making sure that each strand of the cable stays wound up as tight and bundled up the best you can manage. The cables need to go through the tubes and can catch on both ends. It only takes one strand to catch to put a halt to the entire process. They also need to feed through whatever you are using to secure them on each end. I use small aluminum sleeves that crimp and lock the wire in place. I also use some shrink wrap to help cover the ends of the cable to prevent them from catching anything from fishing line to a leg of your pants. This is where I had to work a little to get the wires through the sleeve twice so that I could crimp them. I installed my Sea-Lect Designs footbraces with rudder control and did my best to adjust the cable length properly.
The reverse lock rope that I use is the same rope that is used to stow and deploy the Beavertail Rudder. This black rope has been the source of frustration for nearly everyone who has attempted to install them. I have two tricks that I use and both have worked great so far. First, straighten out a crappie jig and then slightly bend the point of the hook. I’ve used this once the rope has been run through the tube but won’t come out the other end. Just use the tip of the crappie jig to fish the rope out the last ¼” where it catches the hard plastic plug. The other thing you can do is prep the tip of the rope by pinching a piece of the white core and sliding the black cover of the rope away from it a few inches. Trim the white core and then starting a few feet down the rope pinch the black rope and slide your fingers back toward the end. This should slide the black cover over the white core by a few inches. Using a lighter, heat the black cover until is shrinks a little and then melt the tip of the rope slightly to seal it. I used a sharp pair of scissors to trim up the excess so that it would fit in the tube. The rope went through on the first try. I chose not to install the cleat for my application. I only use this feature to lock the motor when I need to move in reverse quickly. If the motor is locked it can be damaged by submerged rocks and stumps because it can’t kick up.
I installed my stow and deploy rope for the Torqeedo on the right side using Yak Attack tie-down eyelet in the gear track and two snagless slotted padeyes to direct the rope away from my camera boom base, my flush mounted rod holders, and the throttle base. I added a Yak Attack short aluminum gear track on the right side of my seat for my throttle control. These projects went really quick.
Trolling Motor Mount M125 (email: ideawerksllc@gmail.com or Facebook: IdeaWerksLLC)
Torqeedo Throttle Mount with Track Mounted LockNLoad Mounting System (https://www.yakattack.us/torqeedo-throttle-mount-with-track-mounted-locknload-mounting-system/)
Torqeedo 1103 AC
Yak-Power Products:
Yak-Power (https://yak-power.com)

- Rod storage
I added two extra rod holders (Feelfree Large Round Flush Mount) next to the existing rod holders on each side of my rear tankwell. There appears to be room for another set, but I’m resisting the temptation to add this third set. I did add a rod holder (Feelfree Rectangle Flush Mount) next to my seat to stage my rod for measuring fish, and retying lures or leaders. I also have a YakGadget Low Pro Crate with five rod holders which brings the total rod holder count for this river kayak to nine rods behind the seat.
Fishing Rod Holder- Flush Round- Large (x2) (https://www.feelfreeus.com/collections/parts-hardware/products/fishing?variant=31999315738763)
Fishing Rod Holders- Flush Rectangular- Medium (Pair) (https://www.feelfreeus.com/collections/parts-hardware/products/fishing-rod-holders-flush-rectangular?variant=31999314919563)
LoPro Crate System (https://yakgadget.com/collections/storage-accesories/products/lowpro-crate-system)

- Anchor system
I installed an Anchor Wizard utilizing the front handle of kayak as the chute to guide and control my round ball 8 pound anchor. I utilize YakAttack Snagless Padeyes to direct any ropes that were not able to be ran inside the kayak. Specifically, I used two pad eyes and a Tie-Down Eyelet to guide the stow and deploy rope for the Torqeedo on the right side of my kayak, and two Padeyes to guide the rope for my anchor toward the front of my kayak.
Anchor Wizard Products:
Anchor Wizard Low-Profile Anchoring System (https://www.fishusa.com/YakAttack-Anchor-Wizard-Kayak-Anchoring-System/?sku=159715)
Snagless Slotted Padeye Kit, 6 pack (https://www.yakattack.us/snagless-slotted-padeye-kit-6-pack/)
- Camera mount
I installed the YakAttack Mighty mount with Fullback for my front camera. This install was simple. I lined up the mount and used it as a template to drill the holes. I drilled the first hole and installed the screw so that I could better drill the second hole. Once the second bolt was installed the last two installed super easy. The first time I installed one of these mounts I drilled all four holes before installing any of the screws. The slightest difference made it difficult to install some of the bolts.
I utilize a RailBlaza MiniPort TracMount Base and Camera Boom 600 R-Lock for the rear camera. These two angles provide a majority of my video content on Flynfish Outdoors on YouTube.
Camera Boom 600 R-Lock (https://www.railblaza.com/products/camera-boom-600-r-lock/)
MiniPort TracMount Base (https://www.railblaza.com/products/miniport-tracmount-base/)
Camera Mount Adaptor (https://www.railblaza.com/products/camera-mount-adaptor/)
MightyMount II with Fullback (https://www.yakattack.us/mightymount-ii-with-fullback/)

- Miscellaneous

The registration numbers for the kayak were ordered from a local print company. Be sure to double-check your states boating regulations for size, spacing, and other important regulations and laws regarding all things boating. And always wear your personal flotation device (PFD) when on the water.
I utilize a YakAttack Double Header to hold my KetchX board which keeps it out of the way and readily available to measure any fish that I catch. I use an elevated YakAttack Roto Grip Paddle Holder to stage my net on the right side. This set-up keeps my limited space clear and managed well.
Tie-Down Eyelet, Track Mount (2-pack) (https://www.yakattack.us/product_p/aap-1016.htm)
DoubleHeader with dual ParkNPole RotoGrips (https://www.yakattack.us/doubleheader-with-dual-parknpole-rotogrips-black/)
RotoGrip Paddle Holder (https://www.yakattack.us/YakAttack_Paddle_Holder_p/grp-1001.htm)
Feelfree Unitrack Adapter- 6 Pack (https://www.yakattack.us/yakattack-feelfree-unitrack-adapter-6-pack-adapter-plate-only/)
GT175 Gen II GearTrac 4” (https://www.yakattack.us/GT175G2_04_p/gt175g2-04.htm)
TowNStow BarCart Kayak Cart (https://www.yakattack.us/townstow-barcart-kayak-cart/)
- Future Upgrades
I would love to add a YakPower power management system to my Moken, and if I ever use this kayak on a lake or large river I would want to have the navigation lights for added safety in areas where boat traffic is a consideration. I am also considering trying out the Feelfree Uni-bar for when I need electronics and more track space. For now I am pleased with this Feelfree Moken 12.5 build with one exception… when using the Torqeedo do NOT use the paddle holder built in to this Moken kayak. On three different occasions the wake created has caught the paddle and pulled one end underwater, which pushes the other end upward. Once I nearly lost a couple rods, a camera boom, and the hat off my head. The other two times weren’t as bad, but the most recent incident did break the bungee that held the paddle in place in the holder.
I recently took the maiden voyage on my new Feelfree Moken 12.5. It was a great first trip! Everything worked perfectly and I was rewarded with this 20.75” monster smallmouth bass. This solo river trip fit the primary purpose for this new kayak. I enjoy going on long float trips. However, by adding a Torqeedo I was able to single launch and fish my way upstream, which is the reason I was able to catch this big fish. This also allows me to fish a river without the need to organize a shuttle and relying on other people to be on time at the end of the day. This comes in handy in a tournament where every minute on the water can make a difference.

Written by Rick Garavaglia, Feelfree US Competitive Team Member
Edited by Bobby Ulrich, Feelfree Pro Staff Team Member