A fish finder. It’s one of the most expensive pieces of equipment you can mount to your kayak. It also has the ability to change the way you fish forever. While mounting a nice graph on your hull seems a little daunting at first, it doesn’t have to be. Today we are going to look at how to mount a fish finder, from start to finish with seven simple questions.
Question 1. “What kind of fish finder is right for me?”
If you only fish the local lakes and ponds in the summertime and rarely branch out from there, you may be in luck. Just a simple down imaging fish finder may be all you need. It will tell you everything that you need to know, including water temp, water depth, and bottom conditions. That may be all you want to put more fish in the kayak.
If you tend to venture out to new bodies of water, fish larger reservoirs, or fish northern waters in the winter, you may want to pay a few extra dollars and get side imaging. This will allow you to learn more about what lies around your kayak, and let you see more potential staging areas for fish in the summer, but also in the winter.
Question 2. “How big of a display do I need?”
While much of this comes down to personal preference, anything from a 4” screen to a 9” screen should do the trick. If you only need down imaging, a smaller screen will work just fine. A large screen might be a better option if you need to see side imaging in detail.
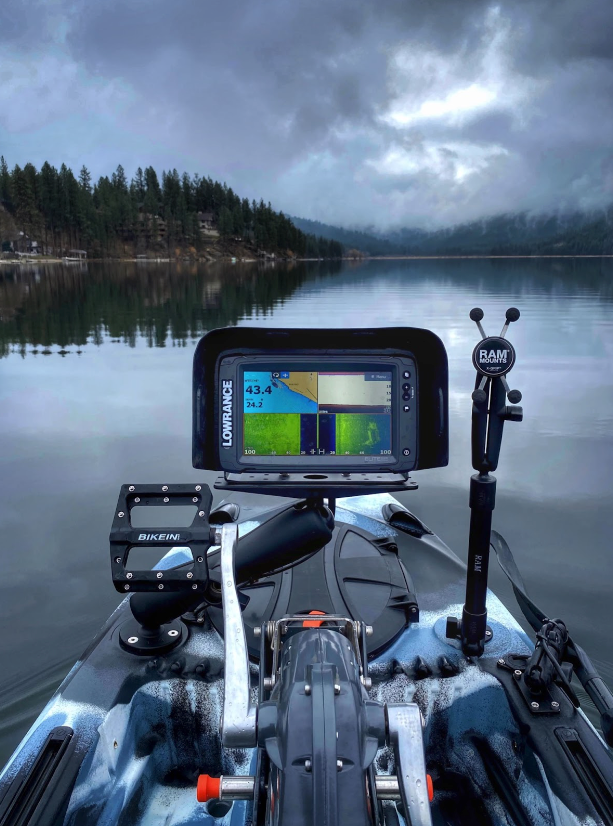
Also take into consideration where you would like your display to be. If you want it just to the side of you, so that you can change settings and add waypoints on the water, then a smaller screen might be perfect. I knew that I didn’t need to have mine at arms reach, so I mounted it in the center of my Lure 11.5, just behind the Overdrive, and I bought a 9” screen so that I can see the screen easier from my seat.
Question 3. “How do I power it?”
Again, this comes down to personal preference. Some guys will buy a larger traditional battery because they want to also power a trolling motor. I opted for a lithium battery from Nocqua. A 10ah battery will power a 9” display with side imaging for around 8 hours, while being small enough to fit in your pocket.
You will probably need to have some simple tools on hand including a heat gun and wire crimpers. But let’s not connect the wires just yet.
Question 4: “Where will I mount it?”
Really there are limitless options for this. But Feelfree makes it pretty simple to mount a fish finder to their kayaks.
Option 1: The pod mount
If you are mounting your fish finder to a kayak that has a Sonar Pod, simply purchase a mount that will allow you to hard mount the screen to the top of the sonar pod, and then do the same for the transducer. Ram Mounts makes some of my favorite brand specific mounts for fish finders and transducers.
Option 2: The rail mount
The second option is to do a rail mount. If you have a pedal driven kayak, this might be your best option. Our friends at Yakattack and Railblaza make great rail mounts for your display.
Option 3: The hard mount
Many Feelfree kayaks have four circular pads that are slightly raised on the bow of the boat. These are mounting pads that are designed to allow you to mount any number of accessories directly to the hull. I utilized these pads to mount, not just my graph, but also a mount for my phone.
Often people are apprehensive about drilling holes into their hull to mount something like a fish finder. Let me reassure you that drilling into your kayak for normal mounting purposes (fish finder, anchor trolly, phone holder, through hull wiring kit or similar) will not void the warranty on your kayak.
If you are worried about reselling your boat in the future, just leave the ball joint screwed into the mounting pad, and purchase another ball joint for your new kayak. That modification actually then becomes a selling feature for any prospective buyer. Your kayak is pre rigged for a fish finder. When mounting anything to the hull that will support more than a few pounds of weight, be sure to add washers to the inside of the hull to better distribute the stress on the body of the kayak.

Question 5: “What do I do with the wires?”
If you are doing a Sonar Pod mount, just contain both the battery and the wires in the pod itself. The Sonar Pod was designed to be an all in one mounting solution for Feelfree Kayaks.
If you are utilizing a rail mount or hard mount, you have two options. You can either purchase a through hull wiring kit from Yakattack, and route all of the cables through the inside of the kayak, or you can just leave all the wires on the outside of the hull.
The benefits of running them through the hull is that it provides a clean, finished look to your kayak. If you choose this option, be sure to route all of the cables before connecting the power cable to the battery cable. On the battery side of the cables, there is probably a fuse box. You don’t want to have to feed this fuse box through the hull. It would require a much larger hole.
The benefits of just routing the cables outside the hull is that you can easily move your fish finder between kayaks.
Question 6: “What do I do with the transducer?”
If you are doing a pod mount, simply attach your transducer to the bottom of the pod with the hardware that came with your fish finder. If you aren’t using the Sonar Pod, you have a couple options based on the type of transducer you have.
If you just have downscan your transducer should be pretty small. Purchase some plumber’s putty at your local hardware store. Take a handful of putty and warm it by massaging it in your hands. Work the putty into a hot dog shape that is just longer than your transducer, and press it into the hull of your kayak, just in front of the hole for the Overdrive. Press the transducer down firmly into the putty. Press it hard enough that the transducer makes contact with the hull of the kayak.
If your fish finder has a side scan transducer, you will need to purchase a transducer arm. A side scan transducer must be in the water. It cannot be inside the hull of the kayak. Some companies make generic mounts that will fit most transducers, and some make special brand specific mounts. Be sure that you purchase an arm that will work with your transducer.
Question 7: “Anything else I should know?”
Just be sure to pay special attention to your transducer when beaching your kayak. You don’t want to have to replace it because you damage it on rocks. Most transducers are pretty resilient, but just be cautious.
If you use an Overdrive, pull up your transducer when you pull up your pedals as you come into shore. If you have a Sonar Pod, just pop the latch that holds it in place. This will allow the transducer to float up a bit if it contacts anything under the surface.
Adding a fish finder has the potential to change your fishing game in significant ways. For more great mounting ideas, check out the Feelfree groups on Facebook, and we’ll see you on the water!
-------------------------------------------------------------------------------------------
Bobby's Kayak Gear List
Yakgear Backwater Assassin paddle
Lowrance 9” Ti2 with Ram Mounts
Railblaza C-Tug with Sandtrakz
-------------------------------------------------------------------------------------------
Written by Bobby Ulrich, Feelfree US Pro Staff Team Member